Tutorials
This is the good place to start if you know a tiny bit of Python but very little about G’MIC commands.
If you are in a hurry, you may head to the related G’MIC Python script and run it right away after a pip install gmic.
Tutorial 1 - G’MIC commands syntax
Here is a little theory about G’MIC commands signature, commands piping and buffer indexes. This sounds complicated but is not at all. This tutorial is for very beginner and easy to follow.
Little theory on G’MIC commands
For this section, you do not need to code or run anything at this point. Just meditate.
G’MIC provides more that 500 commands or filters. Which can get updated from the internet by running the update or up command. This spares you from updating your gmic binary runtime frequently. Instead, a definitions file of many G’MIC commands gets refreshed on your machine, downloaded from gmic.eu.
G’MIC stores images internally in the x,y,z,c space (or width, height, depth, channels), allowing you to work with 2D greyscale images, 2D color images, or voxels (3D points) for many applications.
For executing expressions, the G’MIC language parser allows you to pipe commands from left to right:
<command 1> <command 2> <command 3>
where the result(s) of command 1 is piped as the input of command 2 which outputs in turn to command 3.
In G’MIC each command outputs most of the time a G’MIC Image (or G’MIC Image list if several images are there).
Commands outputting corresponds most of the time to in-place transformation within an input images list. Some times (or always when prefixed with a + sign, eg. +blur), commands can append a new result image to an input images list.
G’MIC commands thus take as input: G’MIC image(s) (or “buffers”), coming from their left side, and also G’MIC image(s) and/or scalar parameters (integers, floats, strings..) on the right side:
<former command's output images> <command 1> <command 1 image and/or scalar parameters>
Example:
input myimage.png blur 3,1

sample earth blur 3,1
The above command will:
open myimage.png from the G’MIC executable current directory,
load it into an G’MIC Images list, which will have 1 item only,
then pipe the list as input to the blur command with parameters 3 (standard deviation) and 1 (Neumann boundary conditions).
From there you will see nothing unless you use the G’MIC command line executable (it pops a display window automatically), so output <filename> or display are your friends for writing or showing a result window.
Here is a more complex example with more commands piping, where the G’MIC List of 2 G’MIC Images is passed modified in place from left to right:
input image1.png image2.png blur 4 sharpen 30 smooth 200 display
You can add a ‘-‘ prefix before your G’MIC commands to make them stand out a little more. It changes absolutely nothing for the result.
-input image1.png image2.png -blur 4 -sharpen 30 -smooth 200 -display
If you want any command in your chain to use only a subset of the leftside results, use the [] index suffix, it will keep the images in your list in place though
-input image1.png image2.png blur[1] 3 display[0]
The above command will actually blur image2.png but display image1.png only, which is not blurred.
Note that G’MIC is a full fledged scripting language, with variables and control flow: repeat, if condition etc... You may also create custom commands or filters.
The gmic.eu website technical’s reference and the G’MIC community Github repository are good friends to learn and ask about G’MIC.
Now is the time to learn some very basic foundational commands for learning and working with G’MIC.
The help <some command> command
import gmic
gmic.run("help blur")

# Outputs
"""


  gmic: GREYC's Magic for Image Computing: command-line interface
        (https://gmic.eu)
        Version 2.9.1

        Copyright (c) 2008-2020, David Tschumperlé / GREYC / CNRS.
        (https://www.greyc.fr)

    blur (+):
        std_deviation>=0[%],_boundary_conditions,_kernel |
        axes,std_deviation>=0[%],_boundary_conditions,_kernel

      Blur selected images by a quasi-gaussian or gaussian filter (recursive implementation).
      (eq. to 'b').

      'boundary_conditions' can be { 0=dirichlet | 1=neumann }.
      'kernel' can be { 0=quasi-gaussian (faster) | 1=gaussian }.
      When specified, argument 'axes' is a sequence of { x | y | z | c }.
      Specifying one axis multiple times apply also the blur multiple times.
      Default values: 'boundary_conditions=1' and 'kernel=0'.

      Example: [#1]  image.jpg +blur 5,0 +blur[0] 5,1

               [#2]  image.jpg +blur y,10%

      Tutorial: https://gmic.eu/tutorial/_blur.shtml

"""
Just in case you are new to Python, you can use the help() command on any G’MIC object.
import gmic
help(gmic)
# Outputs:
"""
Help on module gmic:

NAME
    gmic - G'MIC Image Processing library Python binding

DESCRIPTION
    Use gmic.run(...), gmic.GmicImage(...), gmic.Gmic(...).
    Make sure to visit https://github.com/myselfhimself/gmic-py for examples and documentation.
"""

help(gmic.run)
# Outputs:
"""
Help on built-in function run in module gmic:

run(...)
    run(command: str[, images: GmicImage|List[GmicImage], image_names: str|List[str]]) -> None
"""
The sample or sp command
The sample or sp command allows you to load sample images provided by G’MIC. None are pre-downloaded by default.
If you see network errors when running examples for this section, you should install the curl or wget executable, change your firewall settings or just skip using the sample command for now.
You may also directly read the section about input instead below, which allows you to load your own local images.
First pop some help about the command, and notice how many sample image names you can use as a first parameter.
import gmic
gmic.run("help sample") # or "help sp"

# OUTPUTS
"""
  gmic: GREYC's Magic for Image Computing: command-line interface
        (https://gmic.eu)
        Version 2.9.1

        Copyright (c) 2008-2020, David Tschumperlé / GREYC / CNRS.
        (https://www.greyc.fr)

    sample:
        _name1={ ? | apples | balloons | barbara | boats | bottles | butterfly | \
         cameraman | car | cat | cliff | chick | colorful | david | dog | duck | eagle | \
         elephant | earth | flower | fruits | gmicky | gmicky_mahvin | gmicky_wilber | \
         greece | gummy | house | inside | landscape | leaf | lena | leno | lion | \
         mandrill | monalisa | monkey | parrots | pencils | peppers | portrait0 | \
         portrait1 | portrait2 | portrait3 | portrait4 | portrait5 | portrait6 | \
         portrait7 | portrait8 | portrait9 | roddy | rooster | rose | square | swan | \
         teddy | tiger | tulips | wall | waterfall | zelda },_name2,...,_nameN,_width={ \
         >=0 | 0 (auto) },_height = { >=0 | 0 (auto) } |
        (no arg)

      Input a new sample RGB image (opt. with specified size).
      (eq. to 'sp').

      Argument 'name' can be replaced by an integer which serves as a sample index.

      Example: [#1]  repeat 6 sample done
"""
Let us run the command once, to download an apples file if not on your computer yet, and loading it into our now empty images buffer:
import gmic
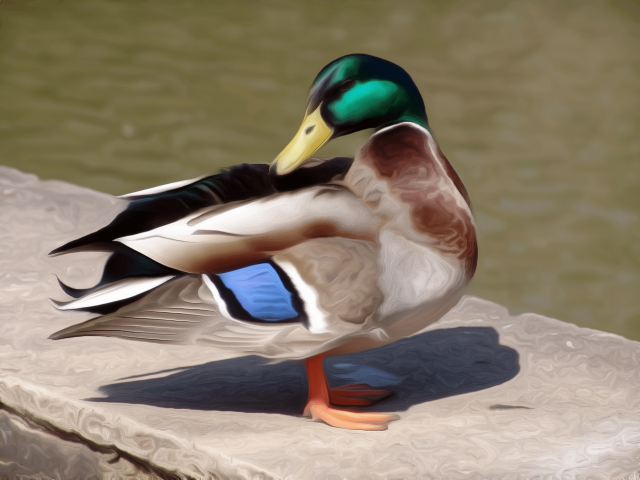
gmic.run("sample apples") # A display window would pop up in gmic's command line executable, but not in Python that is intended!
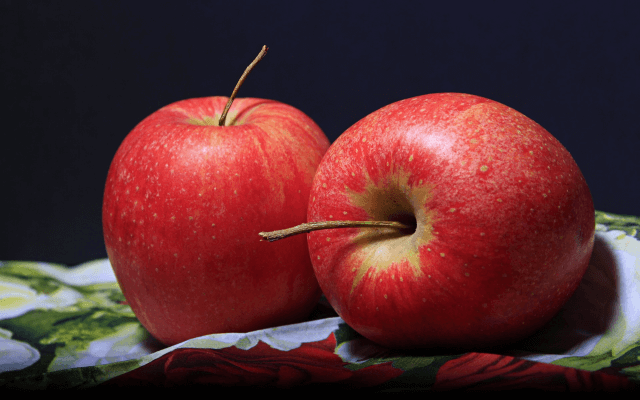
sample apples
The display command
The display command is twofolds: - it displays textual information about an image, - if the environment (operating system, terminal, IPython-like shell…) allows it, tries to show the image in some G’MIC image window, matplotlib view etc..
import gmic
gmic.run("sample apples display") # This will pop up a display window showing your image, without it needing to be saved anyway on your drive
gmic.run("sample duck sample apples display[0]") # Same but will show only index 0 image, ie. the duck

# OUTPUTS
"""
[gmic]-1./ Display image [0] = 'apples', from point (320,200,0).
[0] = 'apples':
  size = (640,400,1,3) [3000 Kio of floats].
  data = (20,22,20,20,20,22,22,22,22,22,22,20,(...),1,1,1,1,1,1,1,1,1,1,1,1).
  min = 1, max = 250, mean = 58.5602, std = 59.8916, coords_min = (317,306,0,1), coords_max = (430,135,0,0).
[gmic]-2./ Display image [0] = 'duck', from point (320,240,0).
[0] = 'duck':
  size = (640,480,1,3) [3600 Kio of floats].
  data = (89,89,74,89,89,89,74,89,89,89,89,89,(...),177,190,177,215,181,194,206,201,153,201,161,209).
  min = 1, max = 253, mean = 125.444, std = 57.4846, coords_min = (364,72,0,2), coords_max = (413,123,0,0).
"""

sample apples

sample duck
The print command
This command is similar to the display command except that it shows no picture, it just outputs text.
import gmic
gmic.run("sp leno print")

# OUTPUTS
"""
[gmic]-1./ Print image [0] = 'leno'.
[0] = 'leno':
  size = (512,512,1,3) [3072 Kio of floats].
  data = (224,224,223,224,224,225,224,224,224,224,224,224,(...),69,85,85,79,87,79,85,90,77,77,79,84).
  min = 1, max = 255, mean = 128.318, std = 58.3599, coords_min = (508,71,0,1), coords_max = (124,189,0,0).
"""
The output <file> command
This command writes your images list’s contents to files, using file extension detection.
import gmic
gmic.run("sample earth output myearth.png") # outputs the result of the earth sample to a path you want (.png, .jpeg, .tiff, .bmp, .pbm and more are supported)
gmic.run("sample earth elephant output mysamples.jpeg") # outputs the result to mysamples_NNNN.jpeg
gmic.run("sample earth elephant output[1] myelephant.jpeg") # outputs the second image (index 1, starting at 0) to a single JPEG file
The input <somefile> command (simple and short form)
This command fills your image(s) list with the contents of files. Note that G’MIC may also allows to open video files directly, especially if OpenCV is linked, although the official gmic-py release does not link to OpenCV.
import gmic

# LOADING AND SHOWING A SINGLE IMAGE
gmic.run("input myearth.png display") # opens myearth.png and then trying a display
gmic.run("myearth.png display") # here is the short form, where 'input' can be omitted. Note that the 'display' command is not obligatory, it is left for you as a proof that it works.

# LOADING AND SAVING MULTIPLE IMAGES
gmic.run("sample earth sample apples output myimages.png display") # saves to myimages_000000.png  myimages_000001.png. The display command is optional.
gmic.run("myimages_000000.png myimages_000001.png display") # loads myimages_000000.png  myimages_000001.png and displays them. Note the 'input' command name was omitted.
Applying a one or more filter(s)
Filtering images is what G’MIC is good at, and especially what most users do with G’MIC.
Official filters and commands are listed at: https://gmic.eu/reference/, especially in the Filtering section.
The G’MIC QT plug-in for GIMP and other graphic software provide more filters, which usually wrap those official filters and have internal layer management specificities.
If you use the latter (they are usually prefixed in fx_ or gimp_ or gui_, beware their community authors do not always care about stability or allowing the same parameters’ order or meaning!
A Gist file explains this in more technical detail if you are very curious.
To get inspiration for commands to run, you may also head to the G’MIC gallery and click the images to see corresponding commands.
Here are some example commands and filters:
import gmic
gmic.run("sample apples blur 4 display") # blur's documentation with a nice preview is also at https://gmic.eu/reference/blur.html not just through the "help blur" command
sample apples blur 4
import gmic
gmic.run("sample apples rodilius 10 display") # more at https://gmic.eu/reference/rodilius.html
sample apples rodilius 10
# SELECTING IMAGES BY INDEX
import gmic
gmic.run("sample apples sample earth blur[1] 4 display") # Here the blur of strength 4 was applied only to image with second position

sample apples sample earth blur[1] 4 keep[1]
import gmic
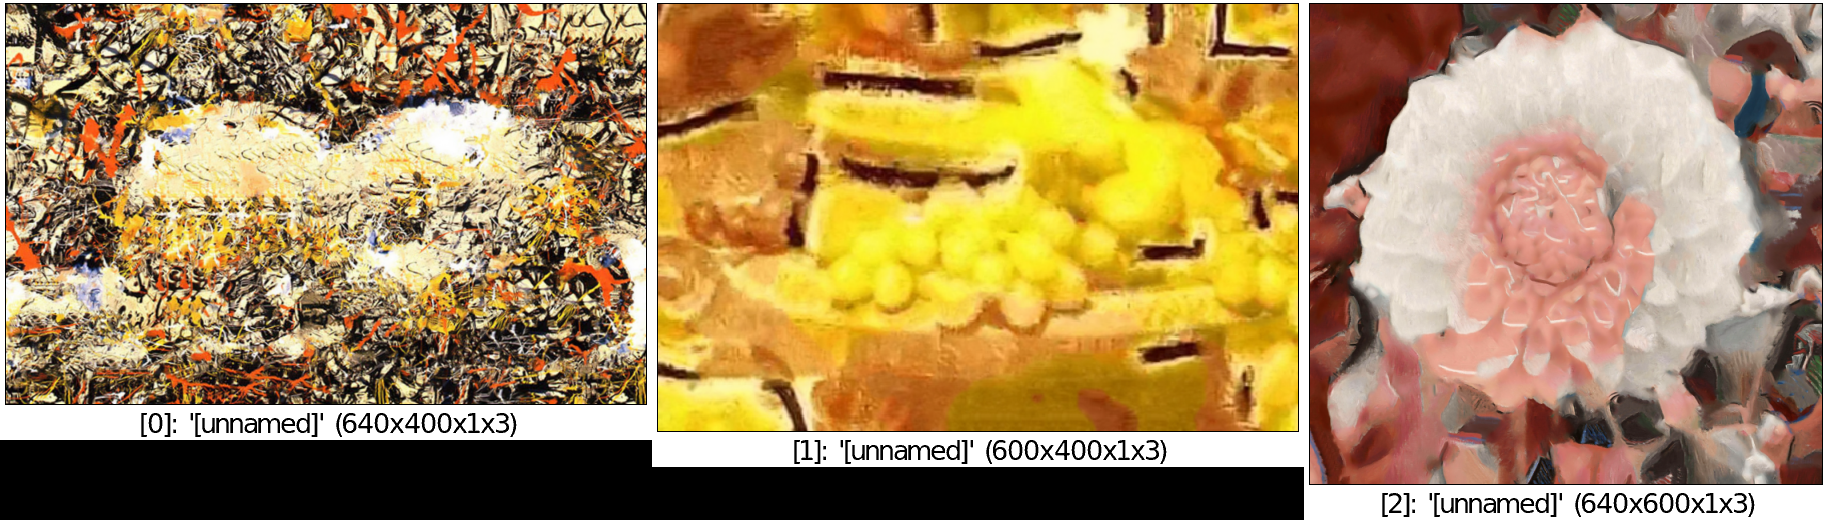
# APPLYING THE FAMOUS 'STYLIZE' STYLE TRANSFER FILTER
gmic.run("sp leno display") # this is the portrait we will want to be stylized
gmic.run("_fx_stylize landscapenearantwerp display") # let us be hackish and use the internal _fx_stylize function to preview one of Antwerp's painting as a future style
gmic.run("sample leno _fx_stylize landscapenearantwerp stylize[0] [1] display")
sp leno
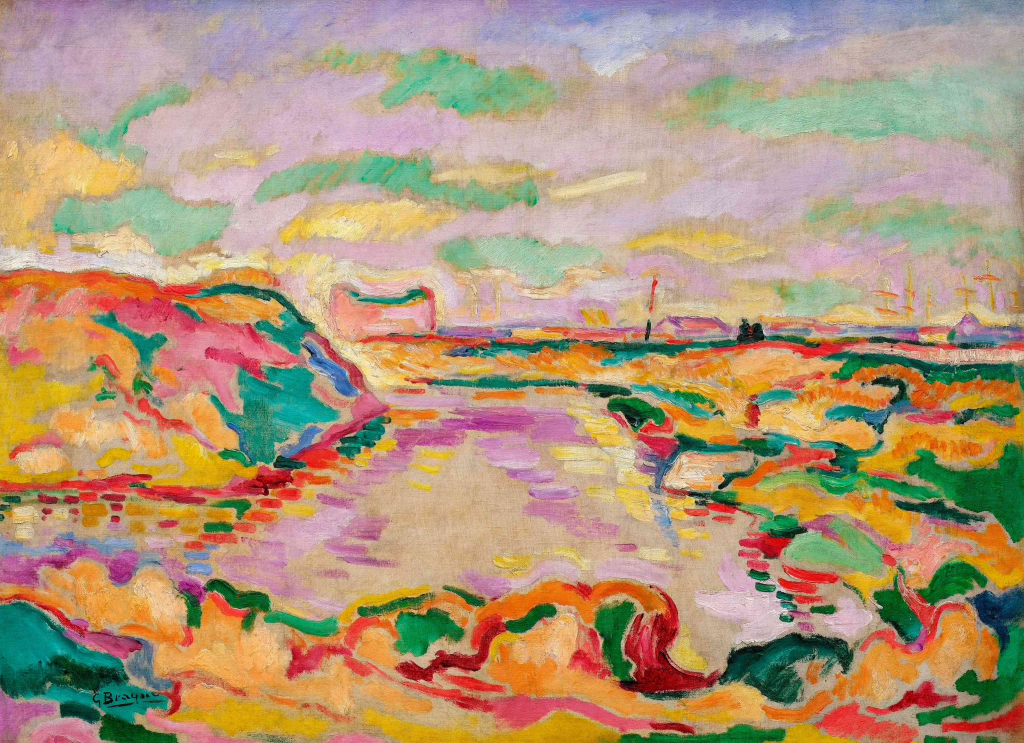
_fx_stylize landscapenearantwerp

sample leno _fx_stylize landscapenearantwerp stylize[0] [1]
# APPLYING MULTIPLE FILTERS
# ONCE
gmic.run("sample duck smooth 40,0,1,1,2 display")
# 3 TIMES
gmic.run("sample duck repeat 3 smooth 40,0,1,1,2 done display")
# SEVERAL FILTERS IN A ROW
gmic.run("sample duck repeat 3 smooth 40,0,1,1,2 done blur xy,5 rodilius , display")
sample duck smooth 40,0,1,1,2
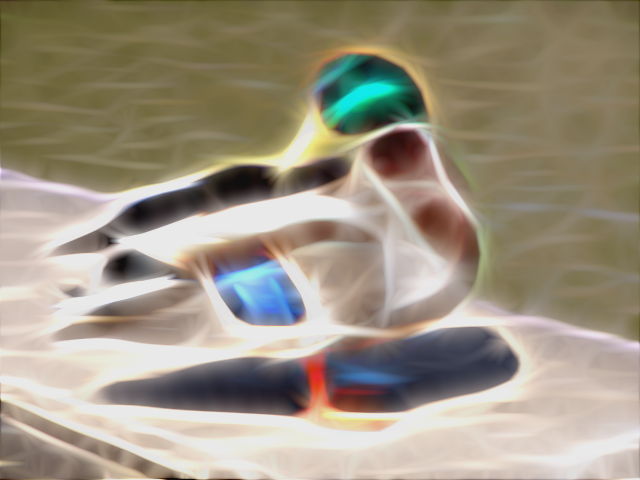
sample duck repeat 3 smooth 40,0,1,1,2 done blur xy,5 rodilius ,
Tutorial 2 - Optimization, GmicImage, lists, stylize
The Python binding for G’MIC or gmic-py (although you “pip install gmic” and “import gmic”) is quite rudimentary.
gmic-py tries to bring together the advantages of the gmic command line tool (a sort of G’MIC language evaluator) with the speed and API-similarity of G’MIC’s C++ library.
Below you will discover core knowledge of gmic-py to optimize your scripts’ processing speed a bit.
This will maybe be boring, but investing time there will allow you to spare CPU time and avoid superfluous file reads-writes, especially if you use gmic-py in some bigger back-end or front-end applications.
Note though, that some of knowledge of how the GmicImage class works is needed, so you might want to read the related section below beforehand.
In this tutorial, let us see how the 3 building blocks of gmic-py can be used together: the interpreter, single images, and images lists. In Tutorial 1 - G’MIC commands syntax, you have used the G’MIC interpreter mostly, without noticing how it was instantiated, and used file input and output to avoid Python-level images management.
The G’MIC module - for debugging’s sake mostly
Let us dive into the Python gmic module elements.
import gmic

print(dir(gmic))

# Outputs:
"""
['Gmic', 'GmicException', 'GmicImage', '__build__', '__doc__', '__file__', '__loader__', '__name__', '__package__', '__spec__', '__version__', 'run']
"""
Most important objects you see in this module-level list are:
Gmic- the G’MIC language intepreter classrun- is thegmic.run()call you see in mostgmic-py’s examples out there. It is a shortcut togmic.Gmic().runorgmic.Gmic(commands)for beginners to kick-off running G’MIC expressions right awayGmicException- an generic exception thrown by most G’MIC classes (along with standard Python exceptions, such as ValueError etc)GmicImage- a wrapper around C++’s gmic_image class (a CImg alias)
Now some quick and dirty notes on module variables:
import gmic

print(gmic.__spec__)  # path were your compiled G'MIC Python loaded shared library lives. Mostly useful to people installing gmic-py several times.
# Outputs:
# ModuleSpec(name='gmic', loader=<_frozen_importlib_external.ExtensionFileLoader object at 0x7fd7f45ab0b8>, origin='/export/home/AAA/.virtualenvs/gmic-sphinx/lib/python3.6/site-packages/gmic.cpython-36m-x86_64-linux-gnu.so')

print(gmic.__version__)  # version of the embedded the libgmic C++ interpreter
# Outputs:
# 2.9.0

print(gmic.__build__)  # flags that were used for compilation.
"""This allows to understand fast if your gmic-py provides jpeg, png, tiff support
interesting flags are: openMP is for parallel computing
fftw3 is needed for spectrum-based computing and managing images with dimensions not in power of 2
OpenCV is by default not linked to gmic-py, although you could rebuild gmic-py easily and use it
"""
# Outputs:
# zlib_enabled:1 libpng_enabled:1 display_enabled:1 fftw3_enabled:1 libcurl_enabled:1 openmp_enabled:1 cimg_OS:1 numpy_enabled:1 OS_type:unix

help(gmic) # shows an introduction about gmic-py
# G'MIC language help can be read using gmic.run("help <somecommand>")
Gmic - The G’MIC interpreter class
gmic.run is a function which spawns a G’MIC interpreter object for you, evaluates your command, then deletes the interpreter object.
For those literate in computer science, there is no singleton design pattern in use here and no interpreter gets cached.
Let us see working but unoptimized example of evaluating several commands:
import gmic
gmic.run("sp apples rodilius 3 display")
gmic.run("sp earth blur 5 display")
In pure Python, the above two lines would be the same as doing (being unsure of when garbage collection for memory-living G’MIC interpreters would happen):
import gmic

g1 = gmic.Gmic()
g1.run("sp apples rodilius 3 display")
del g1
g2 = gmic.Gmic()
g2.run("sp earth blur 5 display")
del g2
gmic.Gmic() instantiates a G’MIC intepreter class. Under the hood, the G’MIC c++ library is made to read its configuration, set up internal variables, detect operating system capabilities etc..
This is a bit heavy and you may not want to repeat that!
For simplicity though, most gmic-py beginner tutorials just write gmic.run().
Here is the better way to evaluate several commands in a row using a single G’MIC interpreter instance:
import gmic

g = gmic.Gmic()  # First create a G'MIC interpreter instance using the Gmic class, and attach to a variable by a simple assignment
g.run("sp apples rodilius 3")  # Reuse your variable as many times as you want, and call its run() method.
g.run("sp apples blur 5")  # Here you are, a 2nd call, where the G'MIC interpreter was not recreated for nothing!
YAY!!! Optimization!!
The G’MIC interpreter does not store images between each evaluation, they are destroyed unless you keep them attached to a Python variable.
Passing in a pure-Python list of G’MIC images is the way to keep track of your images in memory. This will be shown a bit further in the next two sections.
Especially, as the run() method actually takes 3 parameters:
- a command(s) string,
- an optional list of G’MIC images,
- an optional list of G’MIC image names.
You can read more about this by running help(gmic.Gmic) or visiting the API reference.
GmicImage - The G’MIC Image class
After discovering the gmic.Gmic interpreter class, the G’MIC Image is the other building block of gmic-py ( and G’MIC C++).
Here is how to create one from scratch with no data:
import gmic

im = gmic.GmicImage() # without specifying any dimensions
im_ = gmic.GmicImage(width=640, height=480, spectrum=3) # with some dimensions provided

# By the way:
help(gmic.GmicImage)  # Some mini-doc on how to call the GmicImage class
# Outputs:
"""
Help on class GmicImage in module gmic:

class GmicImage(builtins.object)
 |  GmicImage([data: bytes = None, width: int = 1, height: int = 1, depth: int = 1, spectrum: int = 1, shared: bool = False]) -> bool
"""
Now let us take a look at the first image’s properties (attributes):
print(dir(im))
# Outputs:
# ['__call__', '__class__', '__copy__', '__delattr__', '__dir__', '__doc__', '__eq__', '__format__', '__ge__', '__getattribute__', '__gt__', '__hash__', '__init__', '__init_subclass__', '__le__', '__lt__', '__ne__', '__new__', '__reduce__', '__reduce_ex__', '__repr__', '__setattr__', '__sizeof__', '__str__', '__subclasshook__', '_data', '_data_str', '_depth', '_height', '_is_shared', '_spectrum', '_width', 'from_PIL', 'from_numpy', 'from_numpy_helper', 'from_skimage', 'to_PIL', 'to_numpy', 'to_numpy_helper', 'to_skimage']
Here the most important attributes you see are:
_data: a read-only ‘bytes’ buffer, which G’MIC reads and writes as a list of interleaved 32bit float. Interleaving and non-interleaving is a big topic, and G’MIC seems to an exception compared to many other graphics processing libraries: it stores pixel channel values, channel after channel. For example, for a 3x1 pixels RGB image, the _data would look like:R1R2R3G1G2G3B1B2B3instead ofR1G1B1R2G2B2R3G3B3._width,_height,_depth,_spectrum: read-only integers. G’MIC works in 3D if needed and stores its channels (eg. RGB, HSV, or a few million other channels) in the _spectrum dimensions. So an RGB 1024x768 screenshot would have those attributes as: 1024, 768, 1, 3. Any dimension must be >=1.from_*andto_*: conversion methods to and from other graphics libraries!! (as long as you install them first in your virtual environment or machine). Indeed, gmic-py was designed so that you spend more time using other famous tools you already love (numpy and PIL namely..) than working with the less famousgmic-py! Interoperability FTW!
Here are less important methods:
_data_str: is not so important, but for your curiosity, it helps to decode the _data attribute as a unicode string!!! (in same some people wanted to store text in a G’MIC Image… the parse_gui command does this actually)_is_sharedis never used in Python, is relevant when two interpreters or threads work on theGmicImage.
Let us see how a GmicImage is represented as a string:
print(im)
# Outputs:
# <gmic.GmicImage object at 0x7f5d6a028a70 with _data address at 0x26d0180, w=1 h=1 d=1 s=1 shared=0>
So we have just created a GmicImage with default parameters, that is an empty _data buffer, and dimensions width=height=depth=spectrum=1 and no sharing.
If you know numpy, GmicImage object look like numpy’s ndarrays, though the former are much less practical to manipulate!!!
They are actually a very superficial binding of G’MIC’s C++ gmic_image / cimg image class.
To instantiate a GmicImage, you can pass in a bytes buffer, as well as the optional dimensions seen before: width, height, depth. Numpy does that as well.
Here is a complex way to create a GmicImage from fixed bytes-level data and introspect it:
import gmic
import struct  # a handy native Python module to parse and build buffers

# Here we set up a GmicImage with 6 floats and dimensions 3x2x1
im2 = gmic.GmicImage(struct.pack("6f", 1, 2, 3, 4, 5, 6), 3, 2, 1)
# Let us print that image
print(im2)
# Outputs:
# <gmic.GmicImage object at 0x7f5d6a028b10 with _data address at 0x26d0f20, w=3 h=2 d=1 s=1 shared=0>

# You may print the _data buffer and its length, if you are very curious:
print(im2._data)
# Outputs:
# b'\x00\x00\x80?\x00\x00\x00@\x00\x00@@\x00\x00\x80@\x00\x00\xa0@\x00\x00\xc0@'

print(len(im2._data))
# Outputs:
# 24 # Remember a 3x2x1 G'MIC Image makes up 6 floats (always 32 bits or 4-bytes long), so 6x4=24 bytes

# Just in case you wanted to read your GmicImage's data as floats at once, here is a pythonic way
# Reminder: G'MIC stores pixel values in float32 which is the default float type's length on most OSes
floats = struct.unpack(
    "6f", im2._data
)  # "6f" for six floats or str(len(im2._data)/4)+"f"

print(floats)
# Outputs:
# (1.0, 2.0, 3.0, 4.0, 5.0, 6.0)
The GmicImage class has no method to print its pixels into console nicely as you would in numpy with print(mynparray).
For accessing pixels, numpy provides a [] coordinates accessor numpy.ndarray[x,y,z,....] to read matrix cell values.
The GmicImage class pixel accessor is just \(\) parentheses call on a GmicImage instance. That is to say, each GmicImage object is callable.
The signature for this accessor is mygmicimage(x=0,y=0,z=0,s=0), each parameter is optional and defaults to 0.
Important: for now, the GmicImage pixel accessor is read-only. You are encouraged to use I/O functions described in Numpy support or PIL support or Scikit-Image support.
Side note: s stands for spectrum, it is interchangeable with c for channel in most G’MIC literature.
Here are two examples of accessing one or all pixel values:
print(im2(y=1))  # reads at x=0,y=1,z=0,s=0
# Outputs:
# 4.0

for z in range(im2._depth):
    for y in range(im2._height):
        for x in range(im2._width):
            for c in range(im2._spectrum):
                print((x, y, z, c), "=", im2(x, y, z, c))

"""
Outputs:
(0, 0, 0, 0) = 1.0
(1, 0, 0, 0) = 2.0
(2, 0, 0, 0) = 3.0
(0, 1, 0, 0) = 4.0
(1, 1, 0, 0) = 5.0
(2, 1, 0, 0) = 6.0
"""
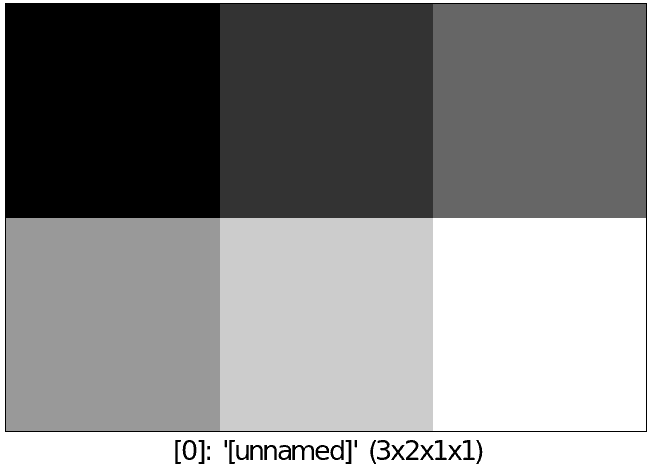
You may also want to view your image with your own eyes:
gmic.run(
    "display", images=im2
)  # Or try gmic.run("print", im2) or gmic.run("output myimage.png", im2) if your environment has no display
"""
[gmic]-1./ Display image [0] = '[unnamed]', from point (1,1,0).
[0] = '[unnamed]':
  size = (3,2,1,1) [24 b of floats].
  data = (1,2,3;4,5,6).
  min = 1, max = 6, mean = 3.5, std = 1.87083, coords_min = (0,0,0,0), coords_max = (2,1,0,0).
"""

tuto2_im2.png
The G’MIC images list (and image names)
Ooops!!! In the former section, we forgot to talk about G’MIC’s intepreter images list parameter and started using it!!
Just for now, here is a little trick which we have done.
gmic.run(), gmic.Gmic().run() or gmic.Gmic() all have the same signature (commands, images, image_names).
Their second parameter, the images parameter accepts a rewritable list of GmicImage objects or a single read-only GmicImage:
If a list is passed, it will be emptied and refilled in place…
If a single
GmicImage, which will be read only (no in-place modification)
Let us call the G’MIC interpreter with both single or lists or images:
import gmic
import struct

im2 = gmic.GmicImage(struct.pack("6f", 1, 2, 3, 4, 5, 6), 3, 2, 1)

gmic.run("display", im2)  # is a read-only operation, we can pass a single GmicImage

# But the proper way to see a change is to put your single image in a list
images_list = [im2]

gmic.run("add 1 display", images_list)  # add value 1 to each pixel then display
# Note above that the min and max value are properly shifted by 1, compared to our first 'display' of im2, before in that same tutorial:
"""
Outputs:
gmic.run("add 1 display", images_list) # add value 1 to each pixel then display
[gmic]-1./ Display image [0] = '[unnamed]', from point (1,1,0).
[0] = '[unnamed]':
  size = (3,2,1,1) [24 b of floats].
  data = (2,3,4;5,6,7).
  min = 2, max = 7, mean = 4.5, std = 1.87083, coords_min = (0,0,0,0), coords_max = (2,1,0,0).
"""
tuto2_im2_add1.png
Let us continue our in-place changed image list study:
print(images_list)
# Not all commands have the same behaviour in terms or adding, replacing or removing images in the input images list
# Here the 'add' command changes input images in place by default, so our images_list is still 1-item long
# Outputs:
# [<gmic.GmicImage object at 0x7fbbe9fd3d30 with _data address at 0x1c16550, w=3 h=2 d=1 s=1 shared=0>]"""

# Let us check if our images list's single item has the same content or address as the original im2 GmicImage... NO! And this is EXPECTED!
print(im2 == images_list[0])
# gmic-py does not change your images in place at all!
# Just empty and refill your list of GmicImages, so keep references around if you want to keep them!
Image names
When we run the G’MIC display or print commands, you may notice in your console or with your mouse in the image display window, that our images so far are all unnamed.
[gmic]-1./ Display image [0] = '[unnamed]', from point (1,1,0).
This is not an issue, though you can give names if you prefer, and refer to those names for indexing:
images_list = []
images_names = ["myapples", "myearth"]
gmic.run("sp apples sp earth print", images_list, images_names)  # No names given
# TODO continue + fix: https://github.com/myselfhimself/gmic-py/issues/81
Wrapping up - stylized fruits example
Here is an example of a stylized nature montage with some parameters injection.
To prepare this example, the following tricks have been used:
the command line command
gmic help sp(orgmic.run("help sp")), to help decide which samples would nice to pick.The gmic.eu Gallery page for Stylization shows sample names parameter supported by the _fx_stylize (which is a non-documented G’MIC internal command providing famous painting samples..)
Actually, since this is a G’MIC internal command, its code can be found here (look for _fx_stylize)
The List of Commands page from the G’MIC online reference, especially the stylize command page
import gmic
g = gmic.Gmic()
# I- Stylization pass
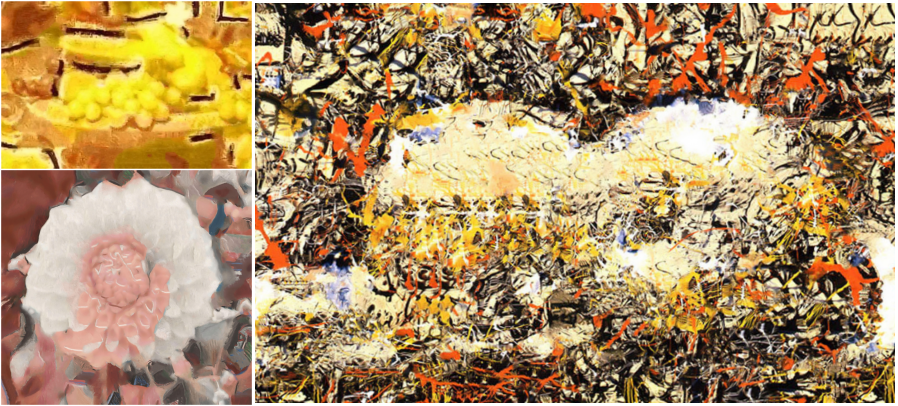
nature_config = [
{"sample": "apples", "style": "convergence"},
{"sample": "fruits", "style": "redwaistcoat"},
{"sample": "flower", "style": "lesdemoisellesdavignon"},
]
result_images = []
for conf in nature_config:
images_list = []
g.run(
"sp {} _fx_stylize {} stylize[0] [1]".format(conf["sample"], conf["style"]),
images_list,
)
print(images_list)
result_images.append(images_list[0])
g.run("display", result_images)
# II- Montage pass
# Build a 3x3-bordered pixels frame around images, white, and make an automatic montage, display it and save to file
g.run("frame 3,3,255 montage X display output mymontage.png", result_images)
tuto2_stylization.png
tuto2_montage.png
That was it for tutorial number 2!
📁 The tutorial’s source code files can be found in gmic-py’s Github’s example directory.
Now you know more about reusing a G’MIC interpreter handle and calling it several times on a GmicImage list.
Congratulations!
Tutorial 3 - filtering a GIF into a flipbook
This tutorial will lead you into filtering frames of animated content using gmic-py:
a moon phases GIF file to make a flip book
a video file to apply time-controlled filters
📁 If you are in a hurry, this tutorial’s source code is on Github in the examples folder.
Goal: Making a moon phases flip book
The strategy behind transforming a GIF into a flip book is to:
split the GIF file into frames
modify each frame to our taste to make them fancier (stars, increasing blur)
make a big montage grid of the frames
save it to PNG and print it on quite thick a A4 paper sheet
cut, assemble and snap them with a binder
time to flip!
If you lack a printer that accepts thick pages, you may as well laser cut your PNG file.
Loading a GIF into a list of GmicImages
Here is a GIF of moon phases by Thomas Bresson under Creative Commons License 4.0 BY, obtained from Wikimedia:

G’MIC does not have internal support for GIF, because the GIF file format has many variants. Instead it relies on ImageMagick’s convert executable if installed.
Let us try to open and display that GIF renamed moonphases.gif (download it from this link directly) into separate frames.
import gmic
gmic.run("moonphases.gif display")

_static/images/tutorial3_moonphases.gif _parse_cli_images append x
Note that we have a green frame which we do not want. Let us remove that first frame systematically.
import gmic
gmic.run("moonphases.gif remove[0] display")

_static/images/tutorial3_moonphases.gif remove[0] _parse_cli_images append x
If this GIF import leveraging convert does not work on your machine, let us try another way using PIL (or Pillow). (You might otherwise install convert).
Here we take benefit from gmic-py’s PIL input/output converter which uses numpy under the hood.
The magic piece of code involved is: gmic.GmicImage.from_PIL() - a static method of the GmicImage class, which returns a GmicImage object from a PIL.Image.Image object .
If the convert-executable technique does work, but you see a green frame as the first frame, skip the PIL step and continue.
pip install Pillow
pip install numpy # compulsory for gmic-py PIL I/O converter to work
import gmic
import numpy
from PIL import Image, ImageSequence

im = Image.open("moonphases.gif")

images_list = []

for frame in ImageSequence.Iterator(im):
    images_list.append(gmic.GmicImage.from_PIL(frame))

gmic.run("display", images_list)
Here is a synthetic adaptive version of both ways:
import gmic
import shutil

g = gmic.Gmic()
images_list = []
GIF_FILENAME = 'moonphases.gif'

# If 'convert' is installed
if shutil.which('convert'):
    g.run(GIF_FILENAME, images_list)
else:
    # If convert is absent
    # PIL and numpy must be installed for this to work
    import numpy
    from PIL import Image, ImageSequence

    im = Image.open(GIF_FILENAME)

    for frame in ImageSequence.Iterator(im):
        images_list.append(gmic.GmicImage.from_PIL(frame))

g.run("remove[0]", images_list) # discard the first black or green frame
# equivalent to this Python expression which works too: images_list = images_list[1:]
g.run("display", images_list)

input_glob tuto3_gif_separated_images_0*.png _parse_cli_images append x
Now we have the images_list variable filled with a GIF’s frames except for the first void frame.
If you are curious to playback your GmicImage list, you may use the animate command with g.run("animate", images_list) (works on a Linux OS with a GUI).
Filtering individual animation frames
TIME FOR SPECIAL EFFECTS!!! (simple)
- We will be adding two special effects:
blinking stars
a growing blur
Adding blinking stars
First let us add random stars on each frame, to make things blink as the Eiffel tower every nighttime hour.
G’MIC’s ``stars` command <https://gmic.eu/reference/stars.html>`_ does just that, and its default input arguments (simplified by a comma ,) are sufficient.
Remember that G’MIC pipes commands from left to right on all the images in the current list.
Since our images list is stored in Python list, we can reuse it in a new command, without having to build a very long G’MIC expression though.
Append the following line to your script, so stars get generated differently for each frame with default settings:
g.run("stars ,", images_list)
Here are three variants for displaying the stars-filtered images_list.
We have been using them since tutorial 1 more or less explicitly:
# basic G'MIC 'display' command
g.run("display", images_list) # The basic one.
# On Jupyter/Google Colab use 'output somefilename' instead, see known issue: https://github.com/myselfhimself/gmic-py/issues/63#issuecomment-704396555

# '_document_gmic' (or '_parse_cli_images append x' from gmic>=2.9.4), for debugging
# beware this replaces your list's contents with single image!
# hence the optional backup with copy.copy() (GmicImage objects are copy()-compatible)
import copy
images_list_2 = [copy.copy(im) for im in images_list]
g.run("_parse_cli_images append x display", images_list_2)
print(len(images_list_2)) # prints '1'

# 'animate' for playing back images (will not work on Jupyter/Google Colab)
g.run("animate", images_list)

input_glob tuto3_gif_separated_images_stars_0*.png _parse_cli_images append x display
Now let us make things unclear with blurring!!
Adding a blur effect
We will use the G’MIC blur command with a strength = frame index * 2.
For looping over the images and applying a different blur strength for each, we would do a Python for loop.
Unfortunately GmicImage objects are immutable in G’MIC and GmicImage lists are emptied and refilled in place (but its items are not edited in place).
A - Pythonic way
Here is a Pythonic not so short way of applying a growing blur on a list of images in place.
for pos, image in enumerate(images_list):
    single_image_list = [image]
    g.run("blur {strength}".format(strength=(pos*2)), single_image_list)
    images_list[pos] = single_image_list[0]

input_glob tuto3_gif_blurred_pythonic_separated_images_0*.png _parse_cli_images append x display
Now, do not believe that G’MIC is slow as hell. It uses OpenMP for parallelization for more and more commands in each new release.
B - G’MIC one-liner way
In case you are satisfied with the former result, you may skip to the next section.
Out of curiosity, here is just a pure-G’MIC syntax alternative for the growing blur, which stands as a one-liner.
g.run("repeat $! blur[$>] {$>*2} done animate", images_list)

input_glob tuto3_gif_blurred_gmicclike_separated_images_0*.png _parse_cli_images append x display
You have added two special effects to our animation!!! Congratulations!!!
Now is the time to flatten all our frames onto a sheet of paper :)
Making a montage of the frames
An A4 sheet of paper is what we typically print on in any office or house in Europe. Its dimensions are: 21 x 29.7 millimeters.
Here is a related montage-making specialists conversation on pixls.us, a community forum.
Let us skip dots-per-inch printing resolution calculation and assume that our final images will be 100 times this ratio in pixels: 2100 x 2970 px.
For our work, the following commands will be used:
frame (aka frame_xy) <https://gmic.eu/reference/frame_xy.html> for adding vertical and horizontal margins to each image,
append_tiles (instead of the more famous montage command) for combining images into a 2D grid,
resize_ratio2d to make the result image fit into our pixel dimensions, without stretching.
Here is what each step with the aforementioned G’MIC commands looks like.
Build frames (padding or margins) :
# Adding a 40px horizontal margin to each frame, and 3px high
g.run("frame_xy 40,3", images_list) # frame and frame_xy commands are the same

input_glob tuto3_frame_xy_0*.png _parse_cli_images append x display
Build a grid (or sort of montage) :
# Make 4-items wide grid of all images,
# 4 is the x-count, the second y-count parameter is omitted (hence ',' comma followed by nothing)
g.run("append_tiles 4,", images_list)
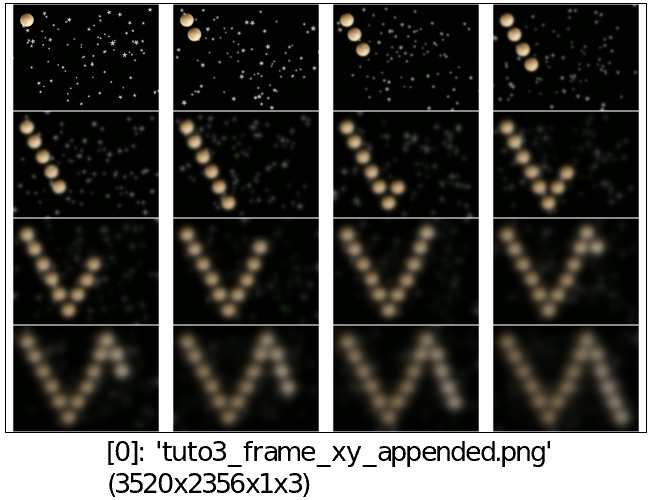
input_glob tuto3_frame_xy_appended.png _parse_cli_images append x display
Resize it to fit nicely on an A4 page :
g.run("resize_ratio2d 2100,2970", images_list)
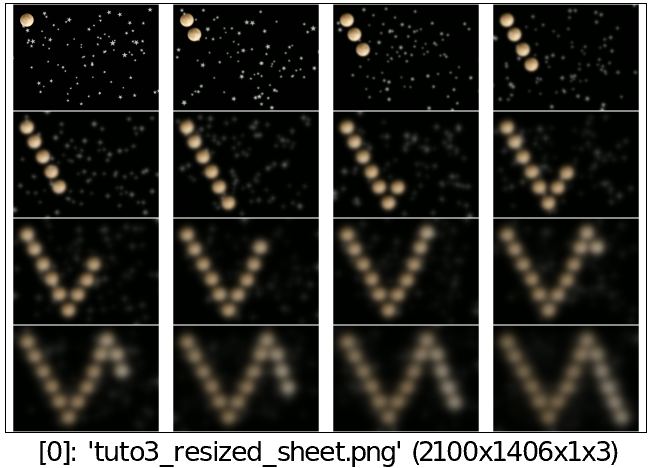
input_glob tuto3_resized_sheet.png _parse_cli_images append x display
As you notice, paper space is not fully used and our image is 2100x1406 pixels big.
You may skip the next section if you are please with this result.
Actually arranging our images in the vertical direction yields use bigger images and less paper space wasting.
For this we use the G’MIC rotate command and swap the append_tiles columns (y) and rows (x) parameters.
Here is a one-liner that spares a bit more space.
g.run("frame_xy 40,3 append_tiles ,4 rotate 90 resize_ratio2d 2100,2970", images_list)
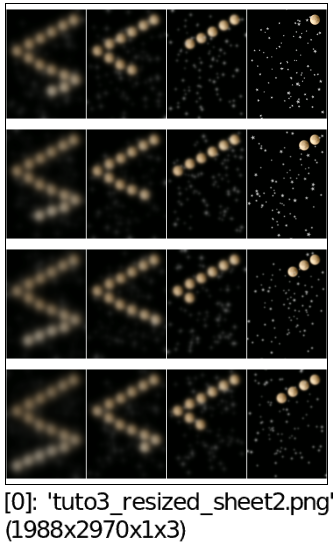
input_glob tuto3_resized_sheet2.png _parse_cli_images append x display
Congratulations !! Your montage is now ready !!!
Saving to PNG and printing
Using Imagemagick’s convert and G’MIC’s output someFile.pdf command, you may output a PDF file for our image. However, there seems to be canvas or view size output misconfigurations.
Instead, G’MIC’s native PNG output will print well using any regular desktop’s printing tools.
The output command is just output yourFileName.someFileExtension.
print(len(images_list)) # images_list has just 1 item: the montage'd GIF frames
g.run("output myGifAsA4Paper.png", images_list) # saves into the current directoy
Note that output works also if you have multiple images in your images_list (or left-side resulting images in the G’MIC expression). In that case, the filename you provide as output parameter will be used as a pattern (eg. myfilename.png -> myfilename_0000.png).
🖨️ Three printing tips: - print on the thickest paper as you can, as long as your printer can stand it without being stuffed; - try to disable any kind of page margin in your printing setup, we do not want to squeeze down our frames; - page resizing is OK though as long as your image ratio is respected.

Cutting and assembling paper frames
Take your best cutter or scissors and cut each frames without mixing up their order :)
We want no white margin to appear.
Stack your paper frames and bind them on the left or right side with a binder (or your fingers hey!!).
Time to flip
This is how my early flip book ended up!! Not that bad!!
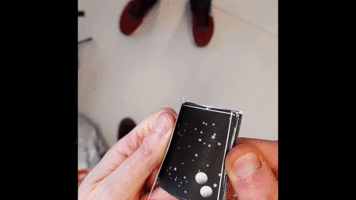
To improve it, I could have more frames (spanning on several printed sheets), colors (or laser engraving), thicker paper (>200g/m2) and a proper binder 🐅
📁 In case you missed it, this tutorial’s source code is on Github in the examples folder.